Slovak version
The purpose of this article is to roughly outline the features that will shape the second version of the Visible Money system. The system’s goal is to serve as a tool through which politicians and public officials can make their assets more transparent. The system allows users to create an account in an online application under which they can store information about their assets and liabilities. This information can then be audited by the public under certain conditions. The system relies on the idea that any inaccuracy, incompleteness, or outright falsehood in an asset declaration will be quickly uncovered once the data is open to public audit.
The aim of the system is to create a kind of positive club of fully transparent individuals – a sort of brand that guarantees that a person in the system behaves in a financially non-toxic way towards their surroundings.
The article is divided into five chapters, each broadly describing the functionality of the system in its various components.
Registration
The registration process includes a multi-tab form that allows users to enter basic information about a new user in several steps. The system includes standard validation mechanisms. Below are screenshots from the registration form:


My data
After logging into the system, the user is taken to the following page:
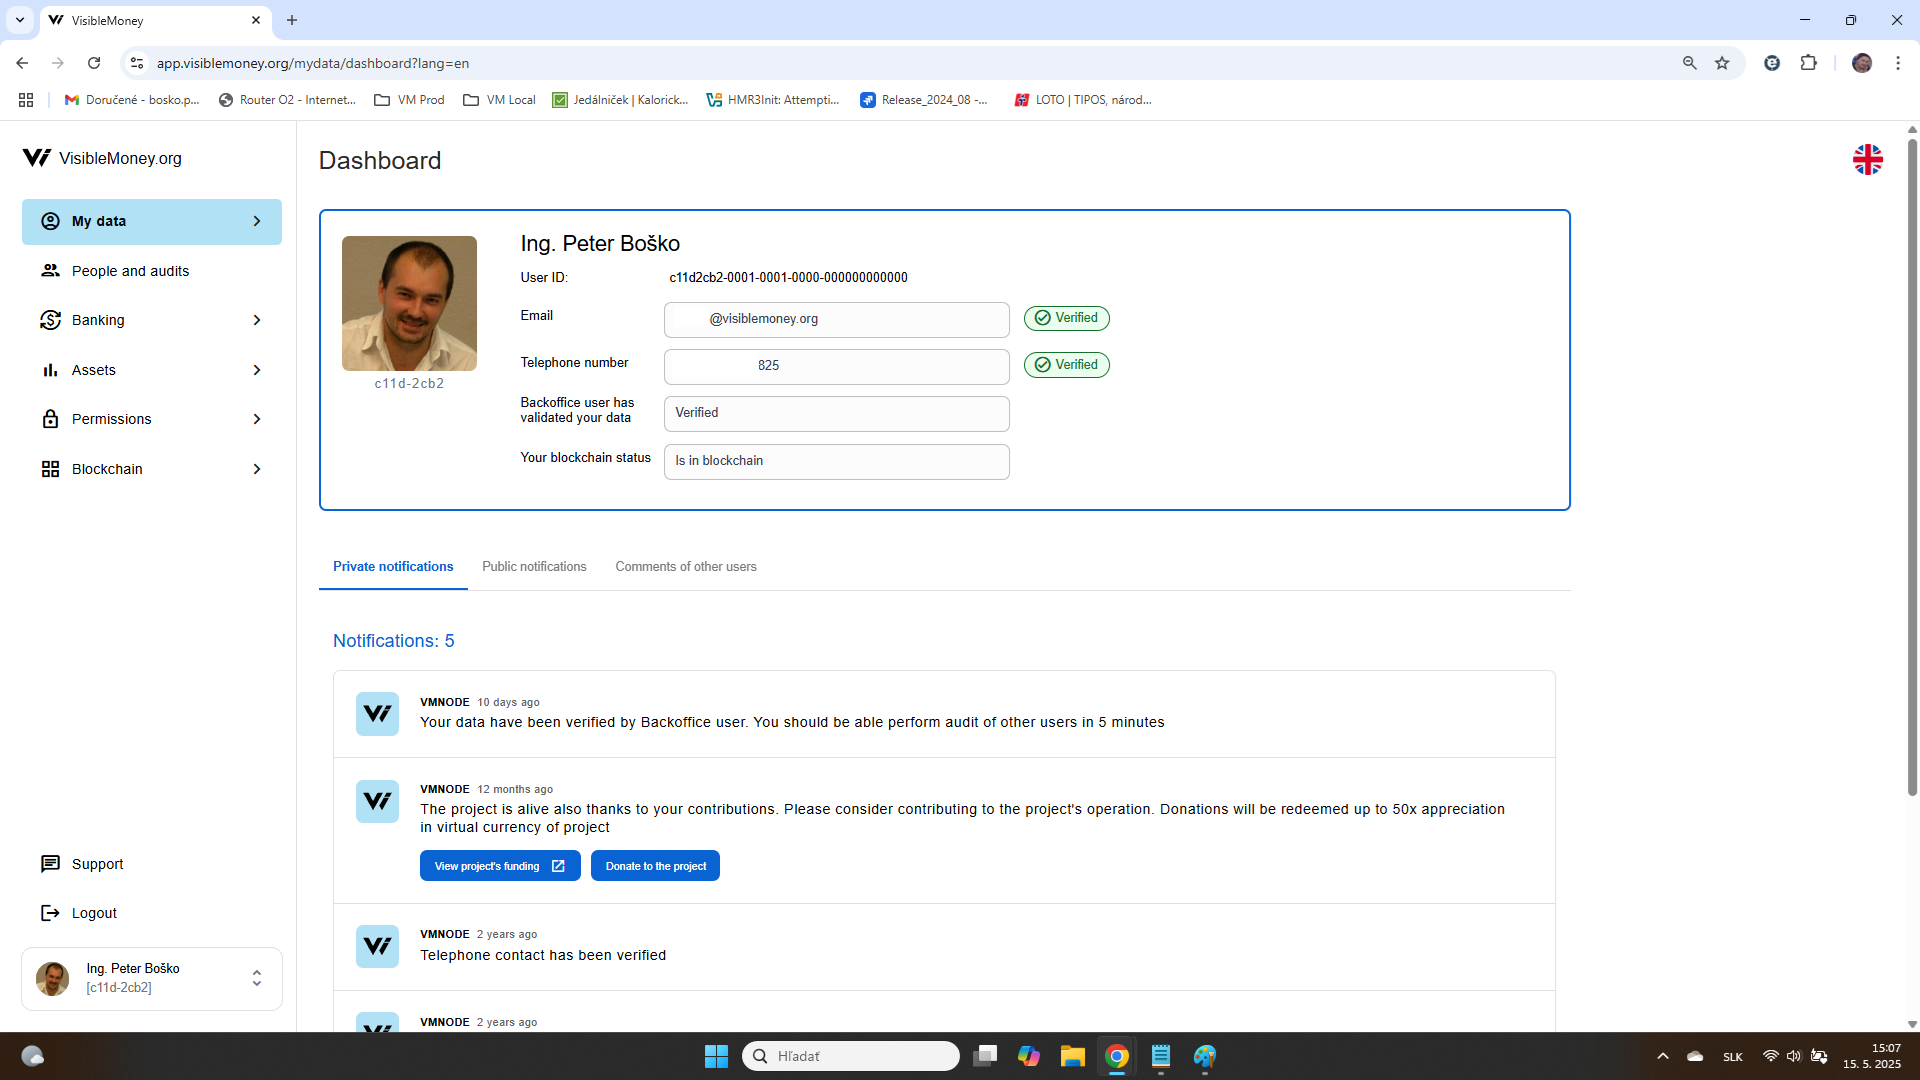
The page—like all other pages in the system—is typically divided into two parts: a left sidebar menu with the main navigation options for the system’s subpages, and the main content area of the page.
My Data includes, among other things, the following subpages: Dashboard, My Info, and Change Password.
Dashboard – The Private Dashboard of the Current User
The dashboard is divided into four informational sections:
Basic information about the current user and their status in the system
Private notifications intended to guide the user to take actions within the system
Public notifications from the system (unlike private notifications, public notifications are visible to all users in the system)
Comments from other users directed toward the current user
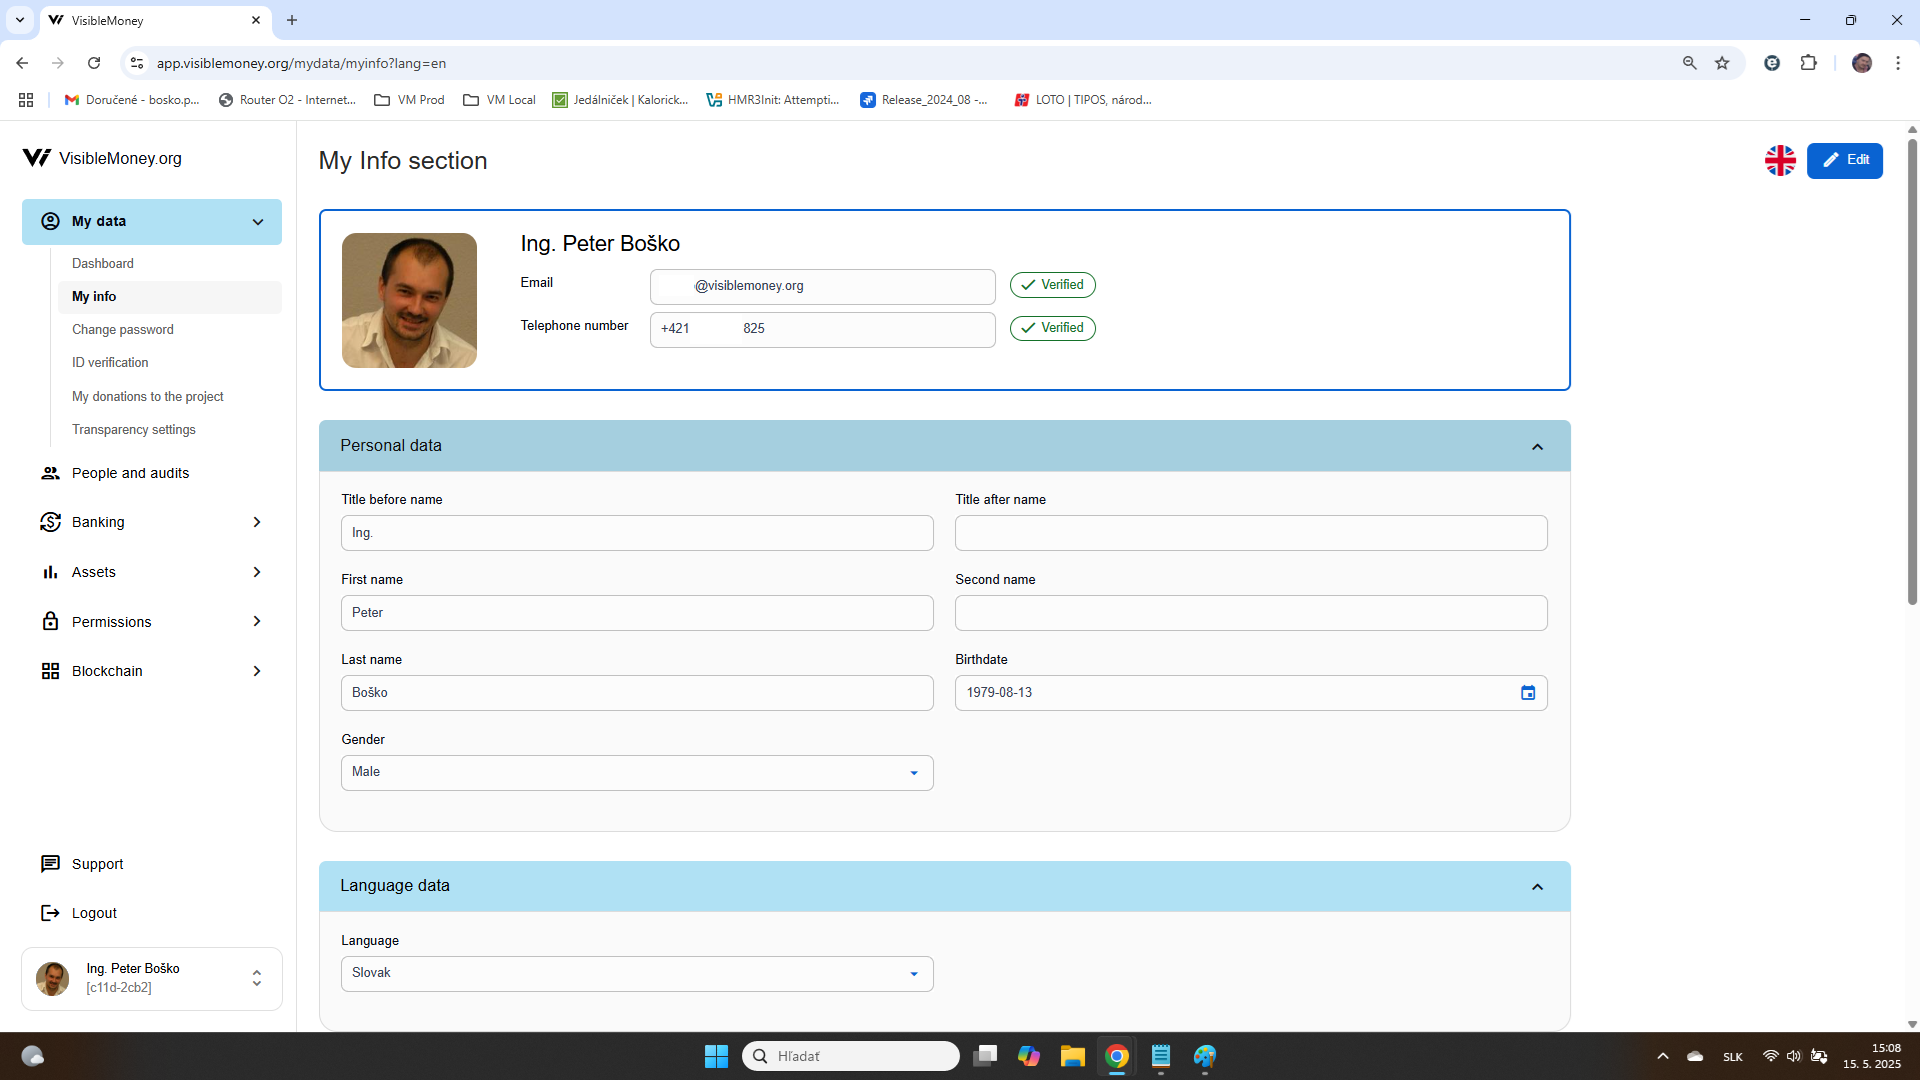
My Info – The Section Where the User Can Modify Their Personal Data
This is the area of the system where users can update and manage their personal information.
Assets
The Assets menu in the application is where users can input information about their assets and liabilities. Clicking on the menu item displays the following page:
The main Assets menu has 5 sub-items in the left panel:
- Asset Subaccounts
- List of Assets
- Assets Overview
- Assets Growth
- Publish to Blockchain
1. Asset Subaccounts
Asset records are grouped into so-called asset subaccounts for the purpose of evaluation. Each asset entry belongs to a specific asset subaccount. All asset-related screens include parameters that allow the user to select which asset subaccount the screen should display data from.
The Asset Subaccounts screen looks as follows:

2. List of assets – This key page provides an overview of asset data. Users can view, add, and modify asset records here.
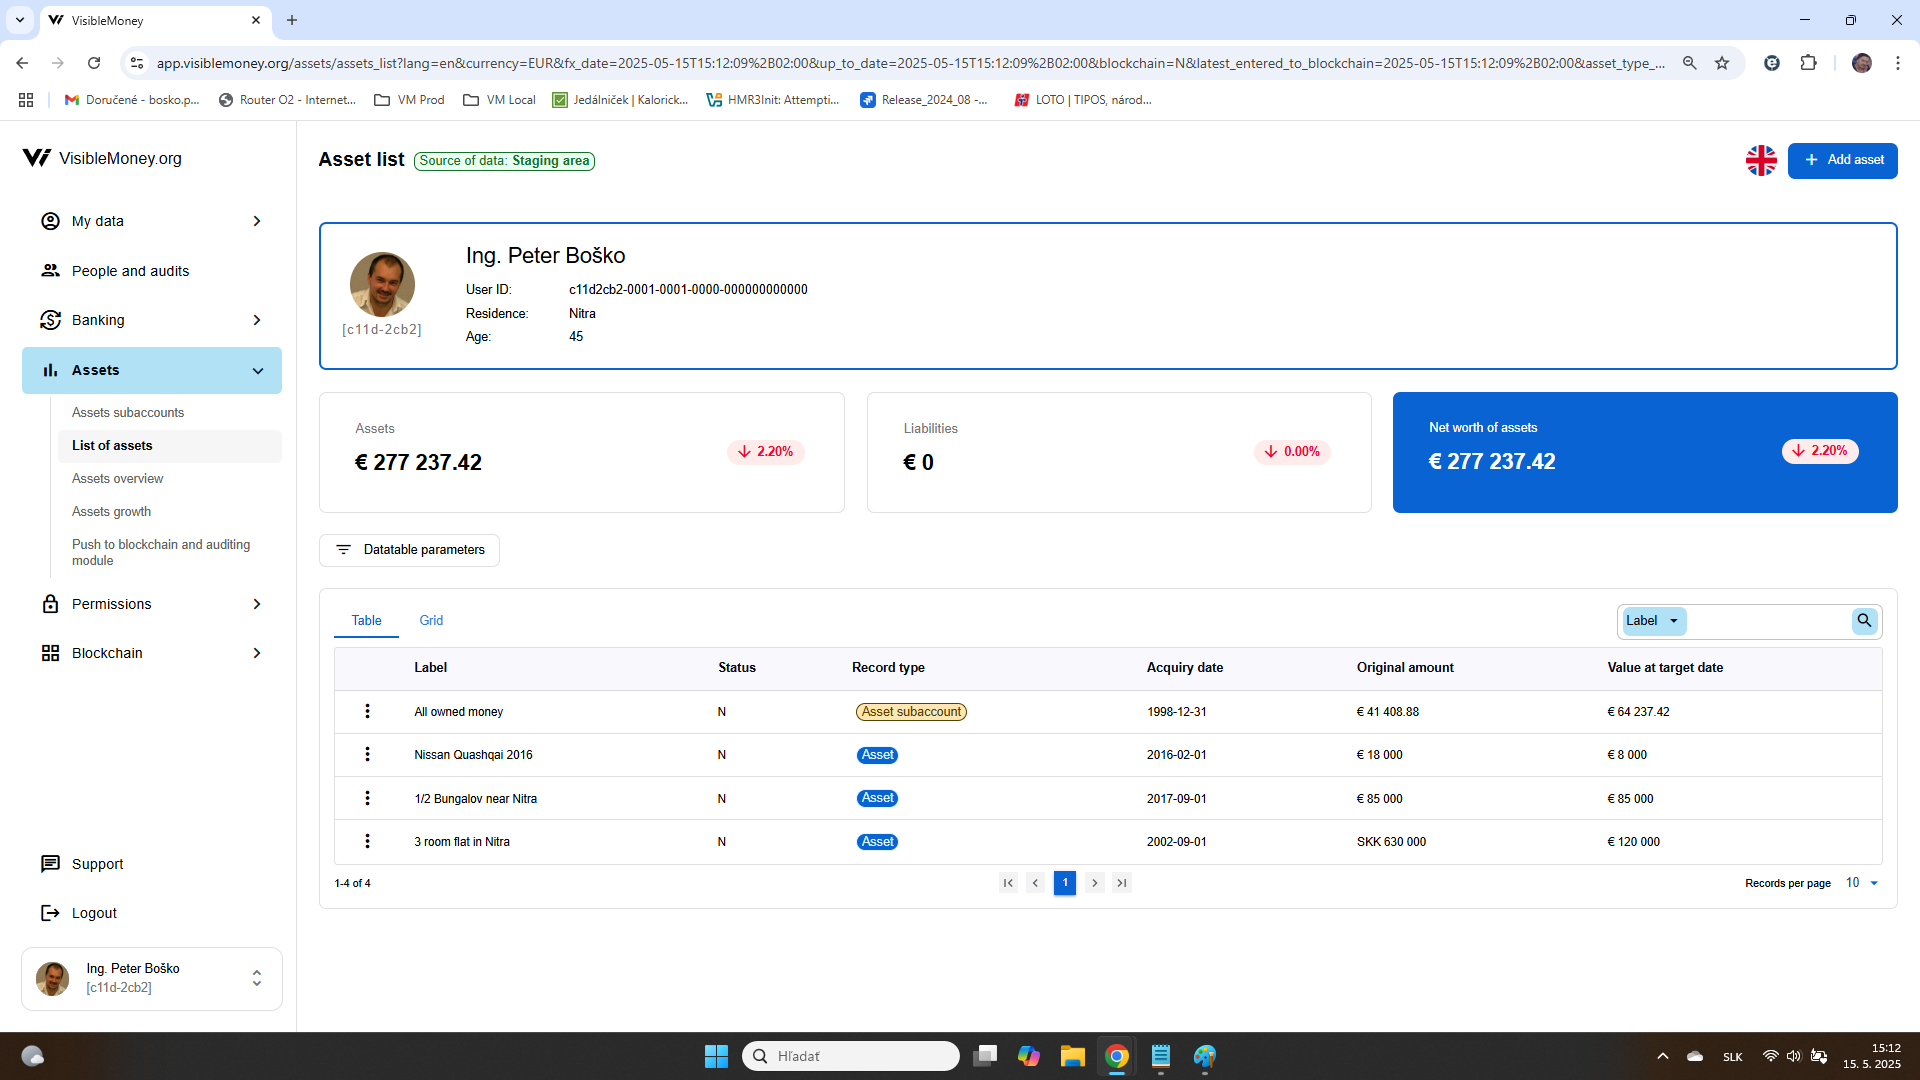
Each asset subaccount is defined by the purpose it serves.
STATIC asset subaccount
The subaccount serves as a container for records describing the user’s assets as of a specific date.
This type of static asset declaration is relatively simple to create: the user lists their assets on a certain date.
A typical STATIC declaration may include:
- Assets: apartment, money in a bank account, car
- Liabilities: mortgage
Advantages:
- Quick and easy to complete
- Ideal for providing a snapshot of one’s finances at a particular moment
LOGICAL asset subaccount
This subaccount acts as a container for asset records that involve a deeper property analysis.
Disadvantages:
- Requires gathering historical documents and reconstructing one’s financial history
Advantages: - Allows for comprehensive asset details, such as:
- Earnings from selling an assets years ago
- History of buying and selling cryptocurrencies
TRANSACTIONAL asset subaccount
This subaccount tracks assets or liabilities of a transactional nature, such as:
- Assets: money in a bank account, cryptocurrencies
- Liabilities: mortgage balance over time
Use Case:
- Suitable when creating an in-depth asset declaration
- Required if the user owns assets or debts that change over time and need to be monitored periodically
Requirements:
- Before adding any records, the user must first set up a hierarchy of asset subaccounts that includes TRANSACTIONAL subaccounts for all relevant asset types
- The Asset Subaccounts section includes a built-in Wizard that assists users in creating and customizing this structure easily
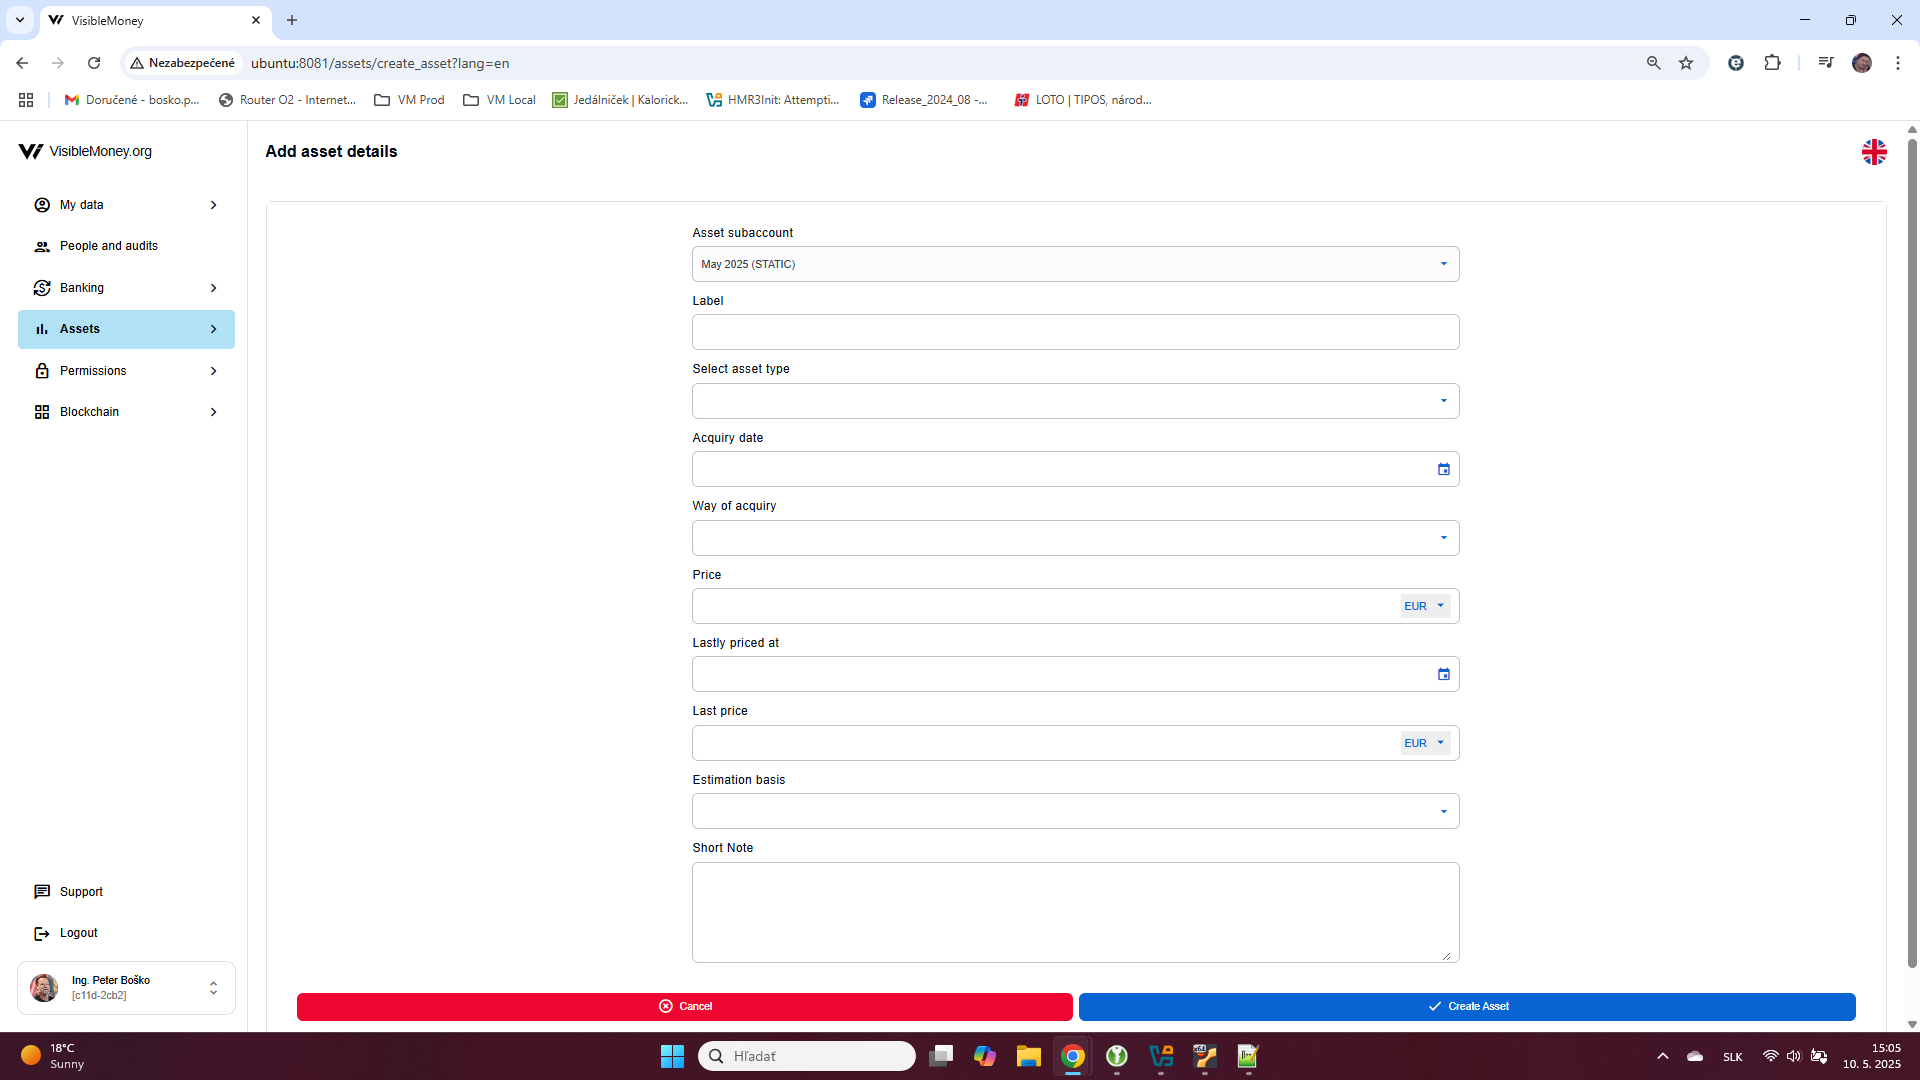
The process of adding a new asset record to a STATIC asset subaccount looks as follows:
When adding an asset record to a LOGICAL or TRANSACTIONAL asset subaccount, the screen appears more complex:

- In the LOGICAL subaccount, the form typically includes fields for detailed descriptions, asset history, acquisition sources, historical values, and links to supporting documentation. Users may need to enter past transactions, ownership timelines, or income events (e.g., proceeds from the sale of a property).
- In the TRANSACTIONAL subaccount, the screen is designed to support ongoing tracking of balances over time. Users may input:
- Transaction dates
- Amounts (inflows/outflows)
- Counterparties (e.g., bank, crypto exchange)
- Descriptions or notes
- Recurring transactions or batch imports (if supported)
This interface is intended to support continuous updates, making it more data-intensive and structured than the relatively simple STATIC input form.
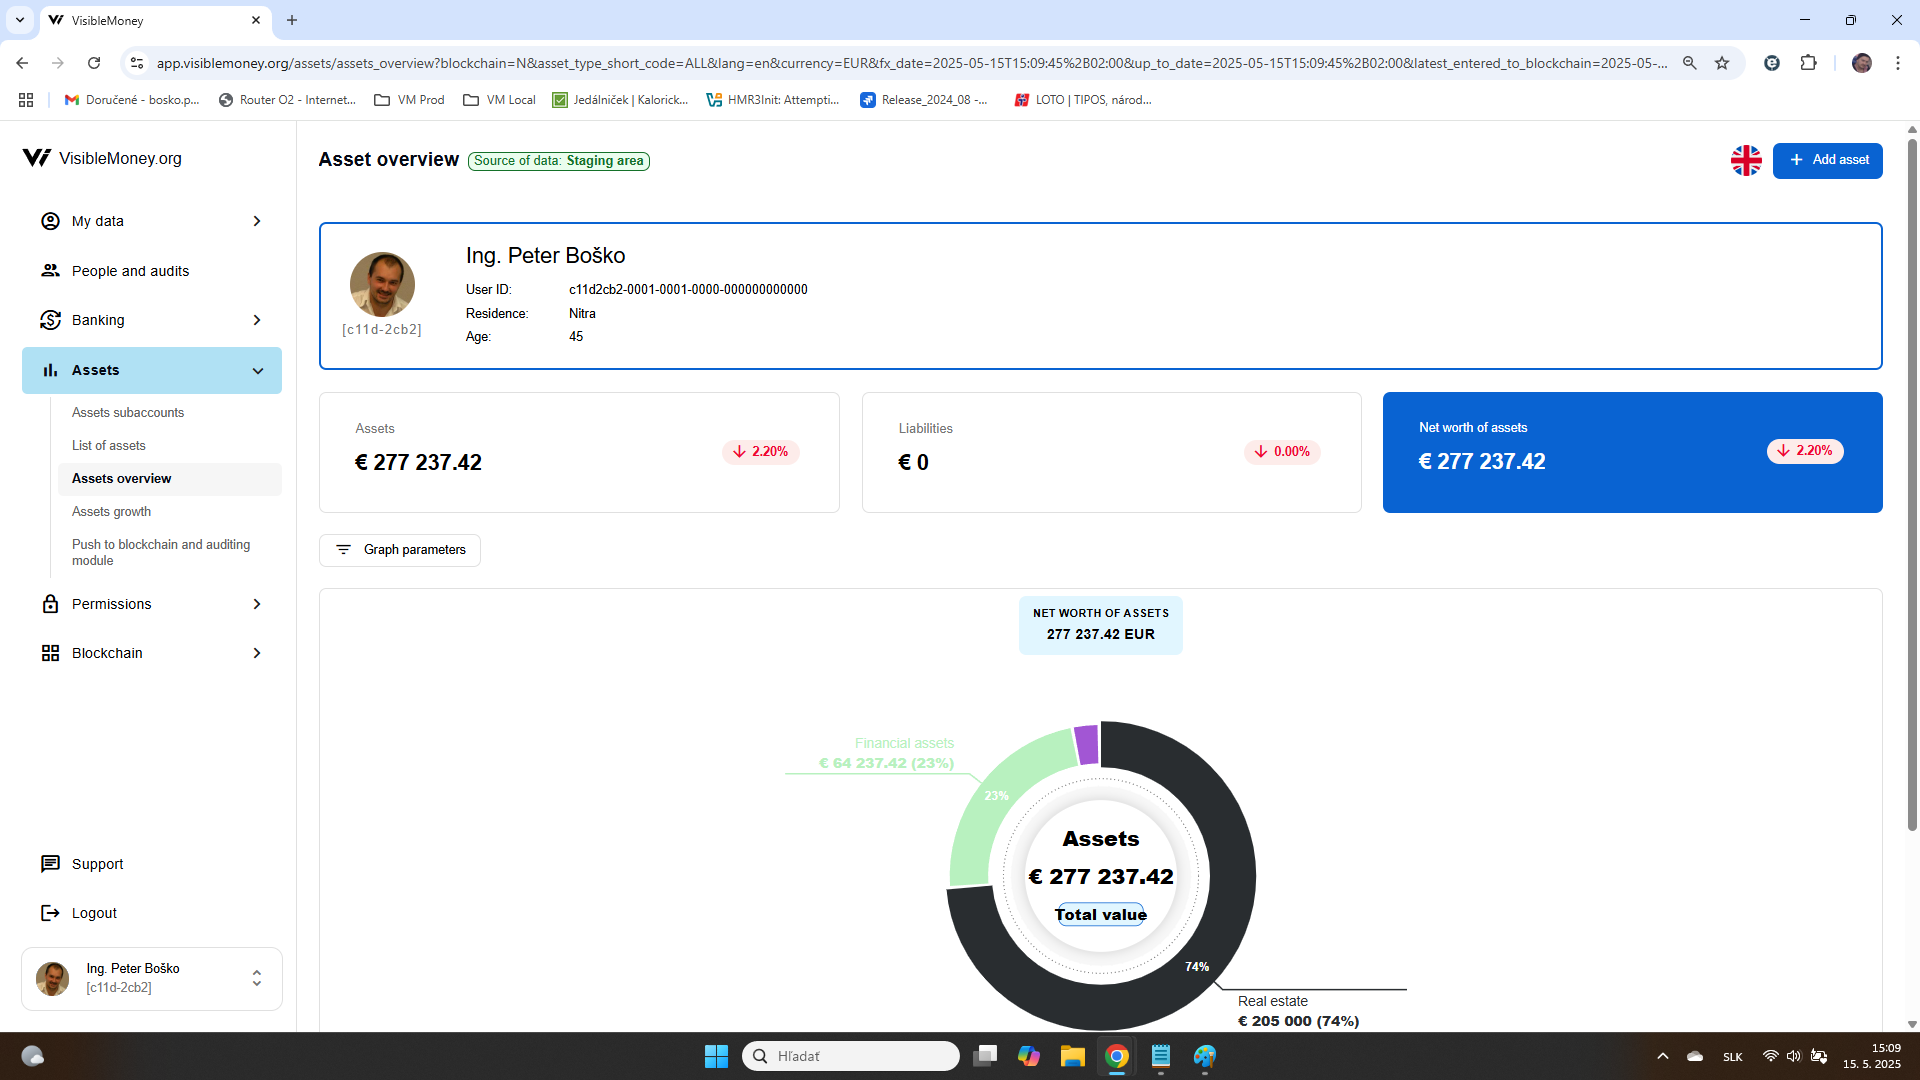
3. Assets overview
Screen contains pie graph of user’s assets and liabilities – overview composed of assets sections composed by asset types:
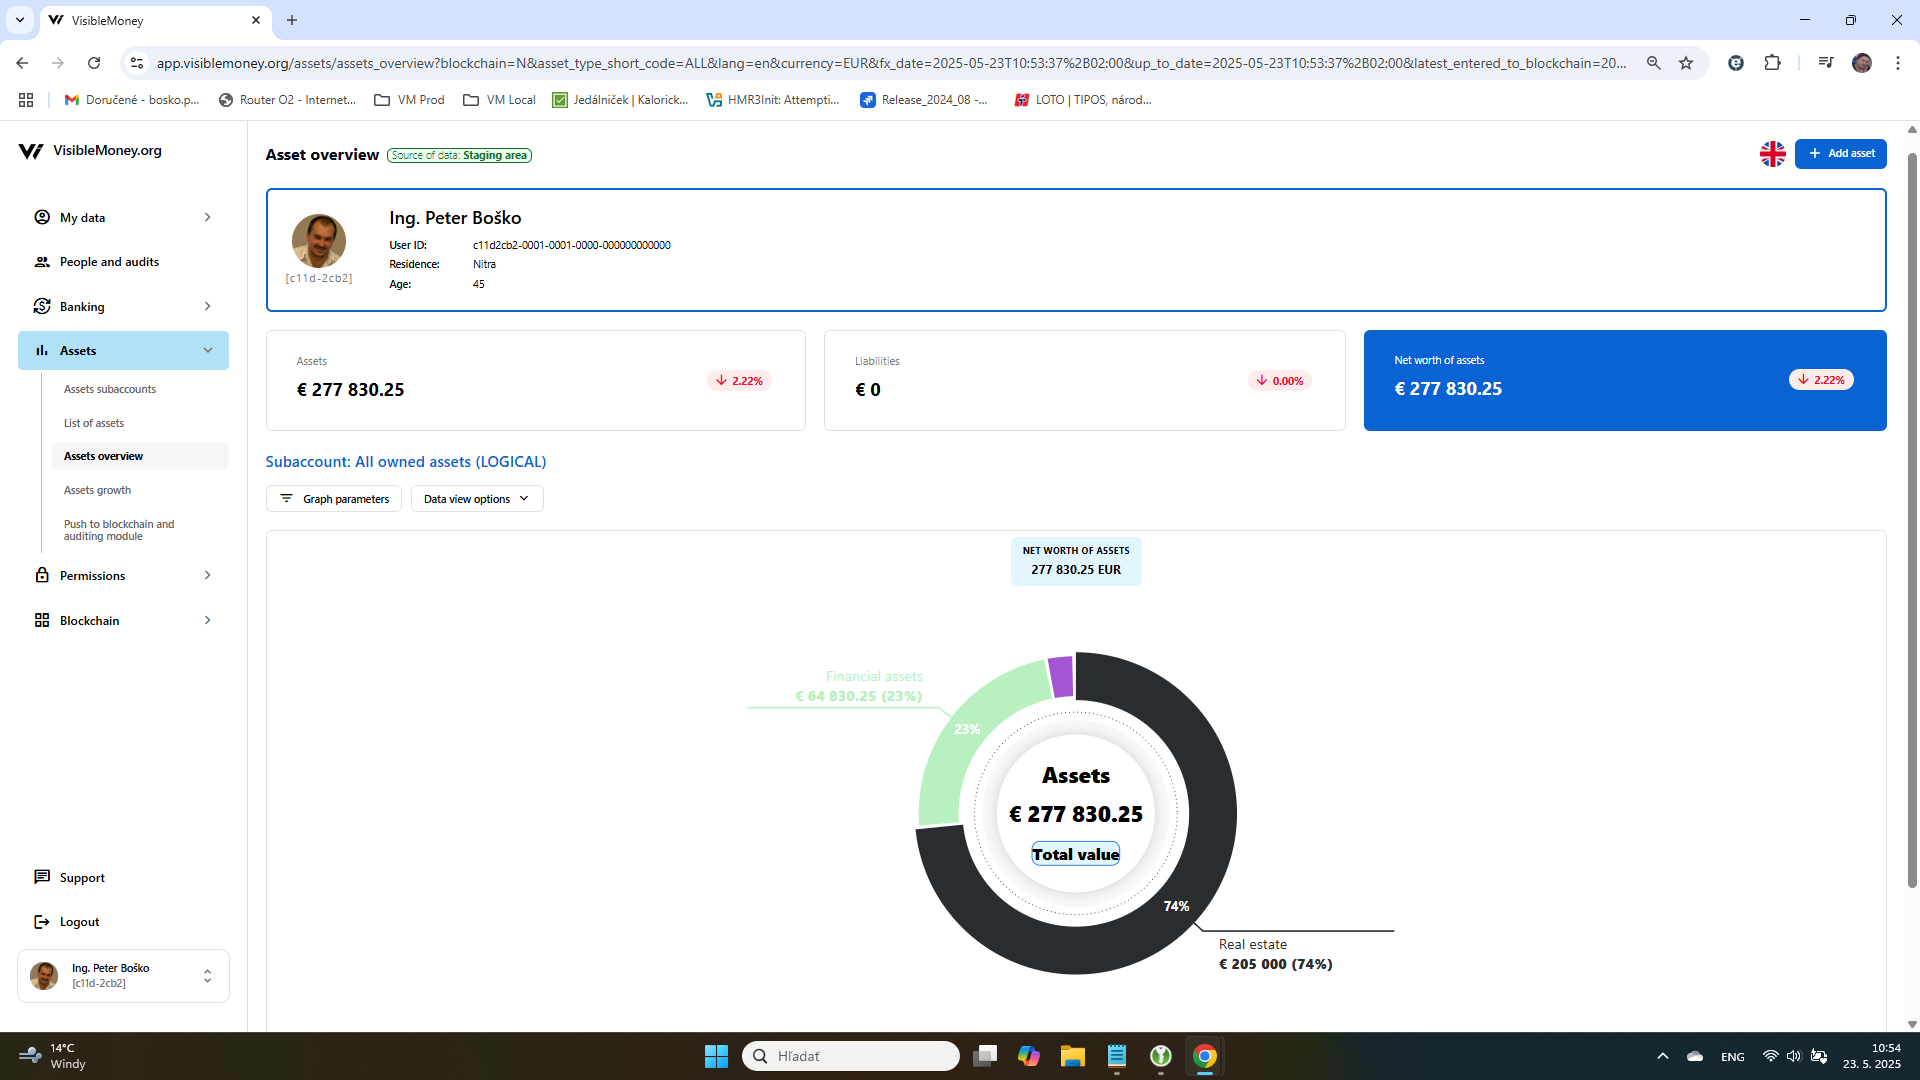
Individual items in the chart can be clicked to drill down into deeper levels of the asset structure.
4. Assets growth
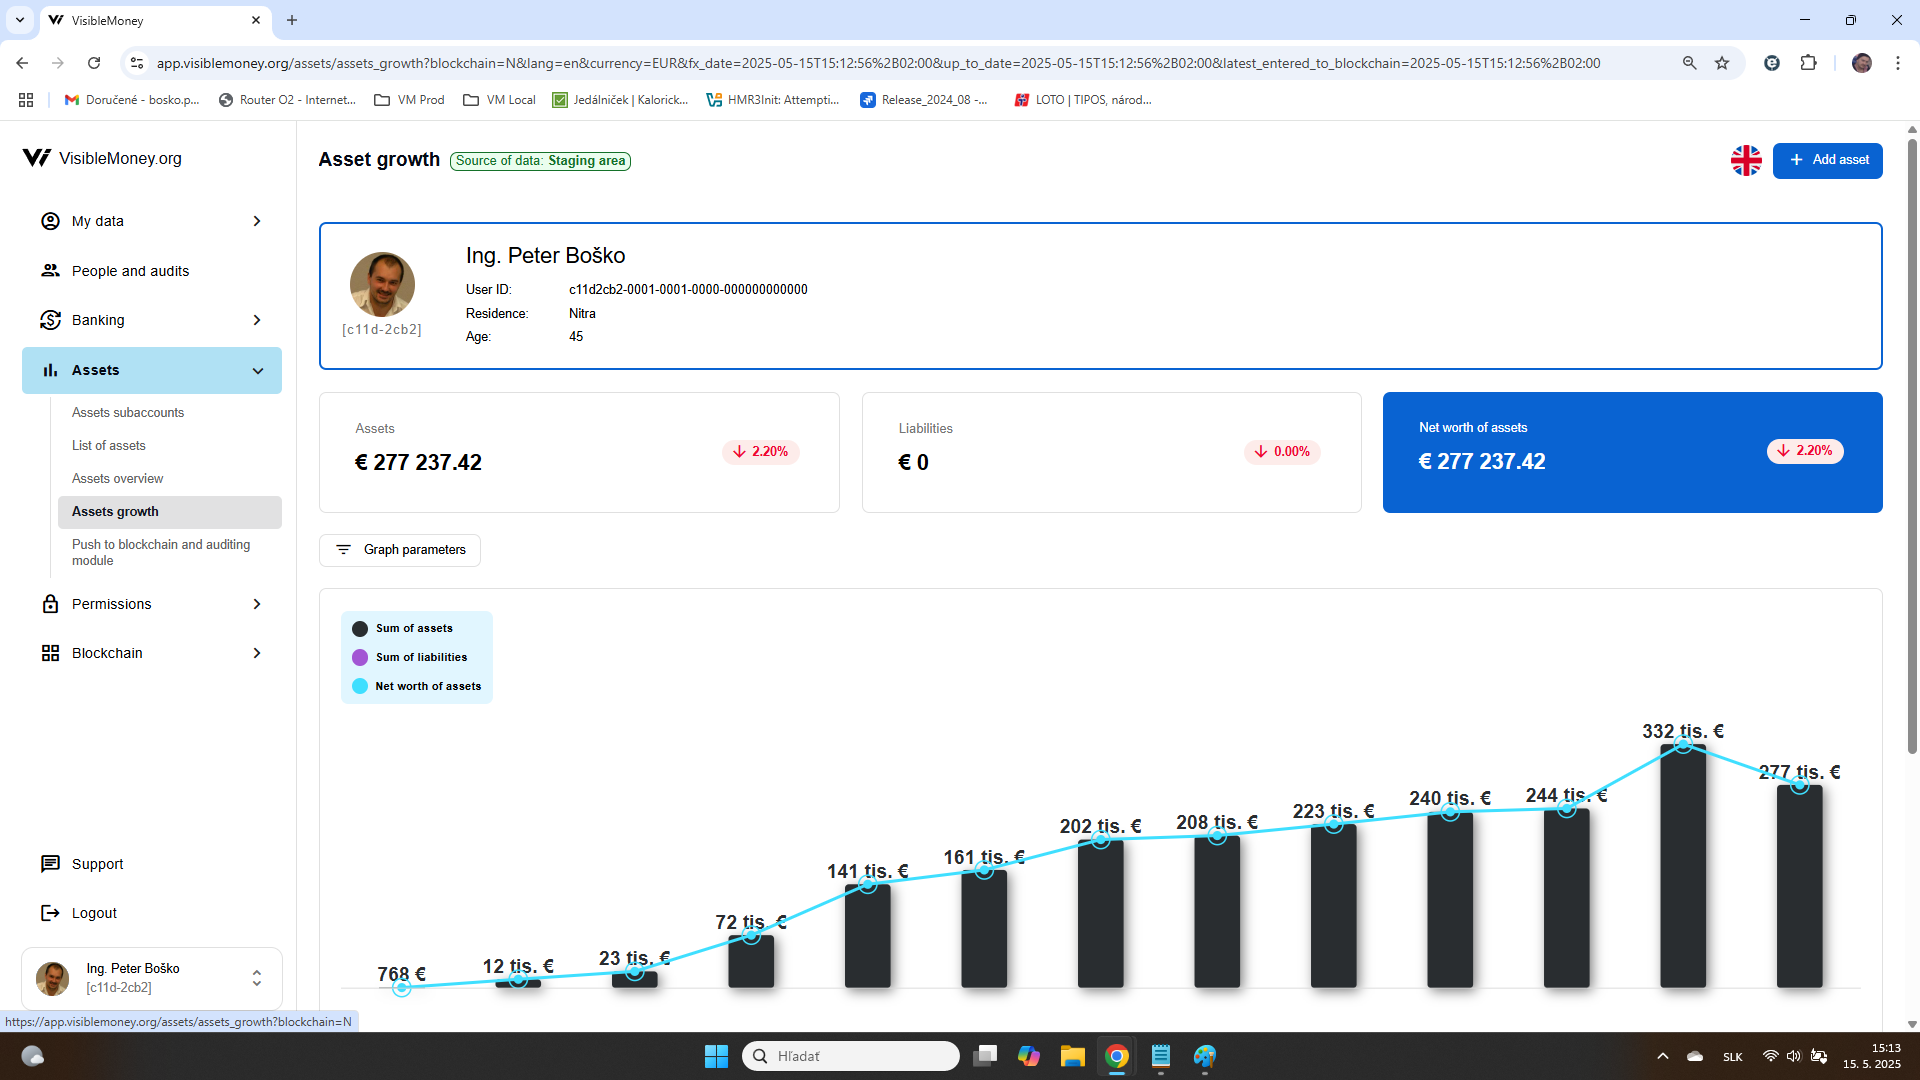
Black bars represent the user’s assets, while liabilities are shown in purple.
A blue line indicates the net difference between these two figures.
The chart is also interactive—clicking on it reveals either:
An asset overview for that date.
A detailed list of assets at a specific point in time, or
The graph can be clicked again to display a list of assets at a specific time or an overview of assets at a specific time
5. Publish to blockchain – In this section, users can publish their asset data to the blockchain component of the system. After publishing, other system users can view the asset data in the Audit module.
Blockchain
This section of the application contains screens through which users can verify that data sent to a third-party blockchain system (such as Amazon Quantum Ledger) matches the data stored in the system.
People and Audits
The People and Audits module serves as the entry point to the system’s auditing functionality.
Upon clicking, the user is presented with a list of individuals in the system who have passed validation mechanisms and whose asset data has been published to tables that serve as the basis for the auditing module.
These users have opted for transparency, making their financial information available for public scrutiny under the rules of the system:
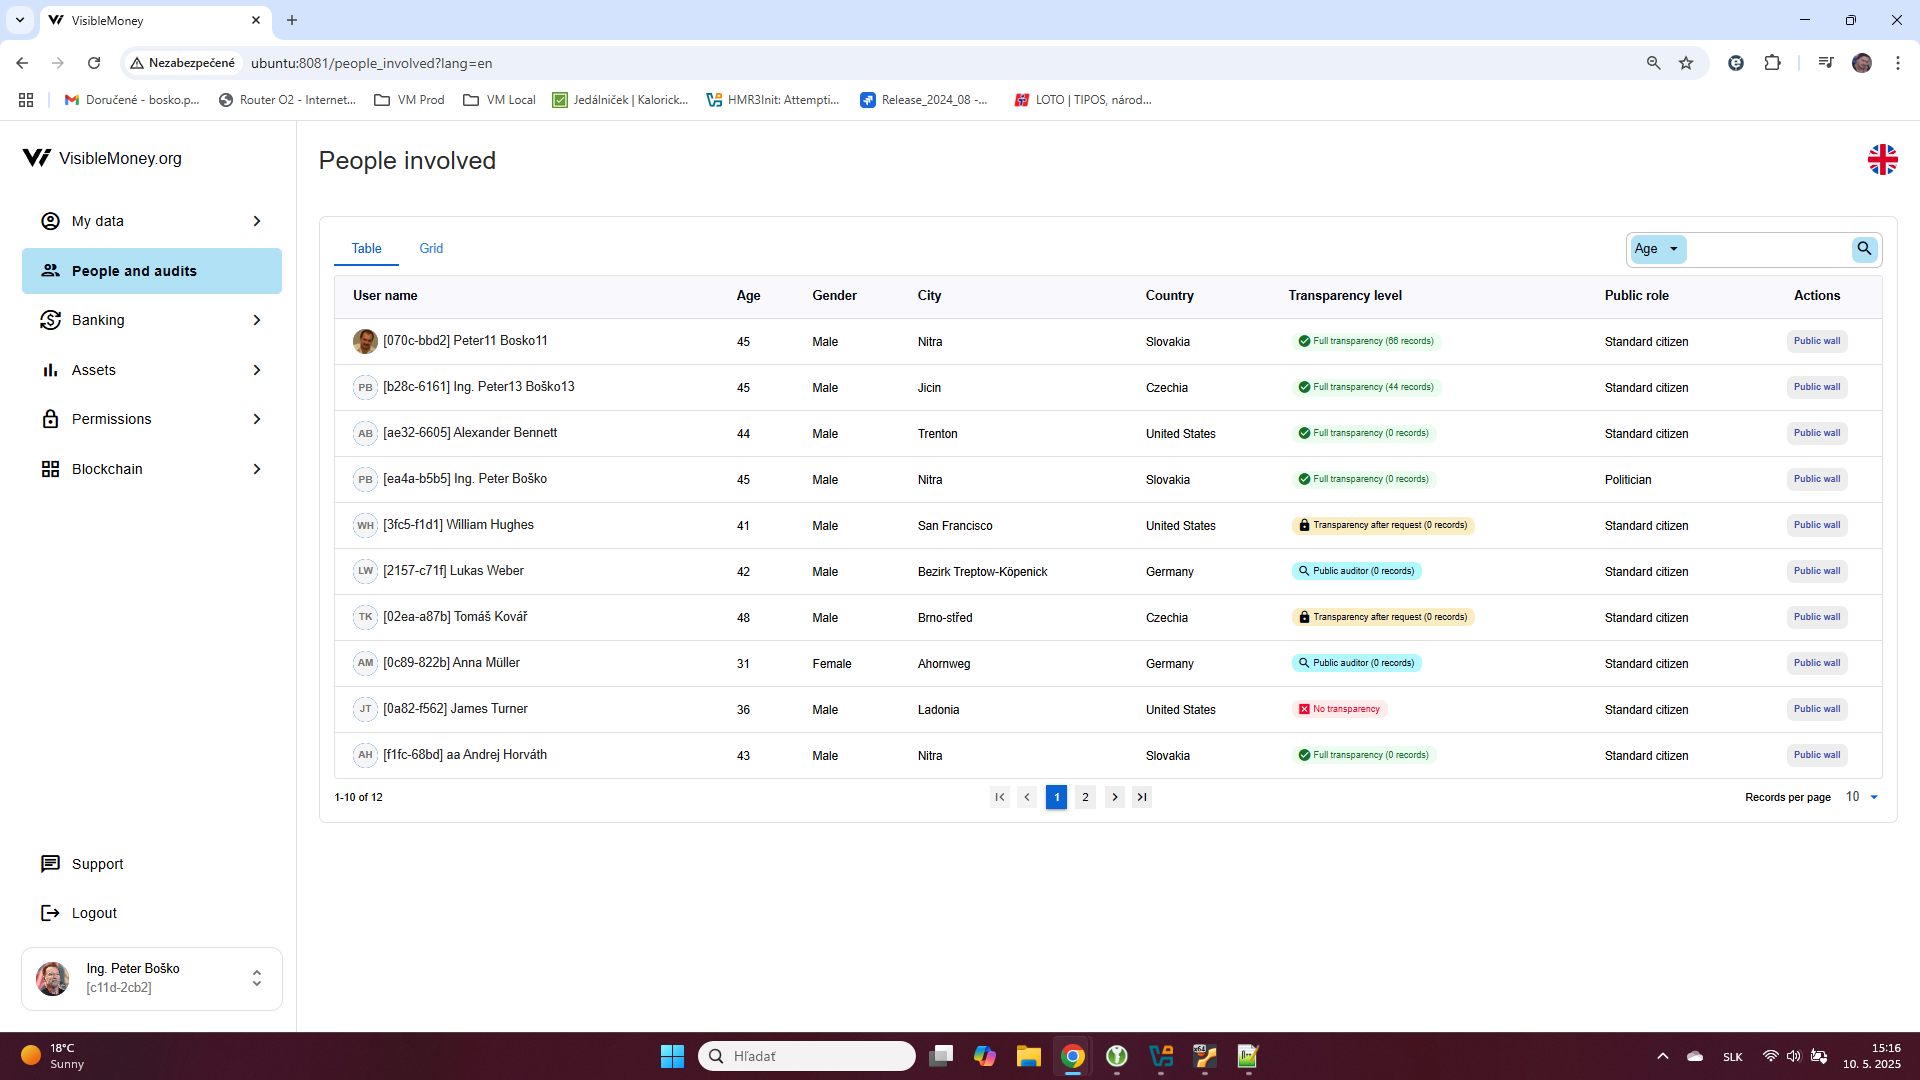
The table includes basic identification details of the person, their age, city of residence, gender, state, the level of set transparency, positive score points, negative score points, the total score, and a button labeled ‘PUBLIC WALL’ that allows access to the individual’s public noticeboard.
The noticeboard screen looks like this:
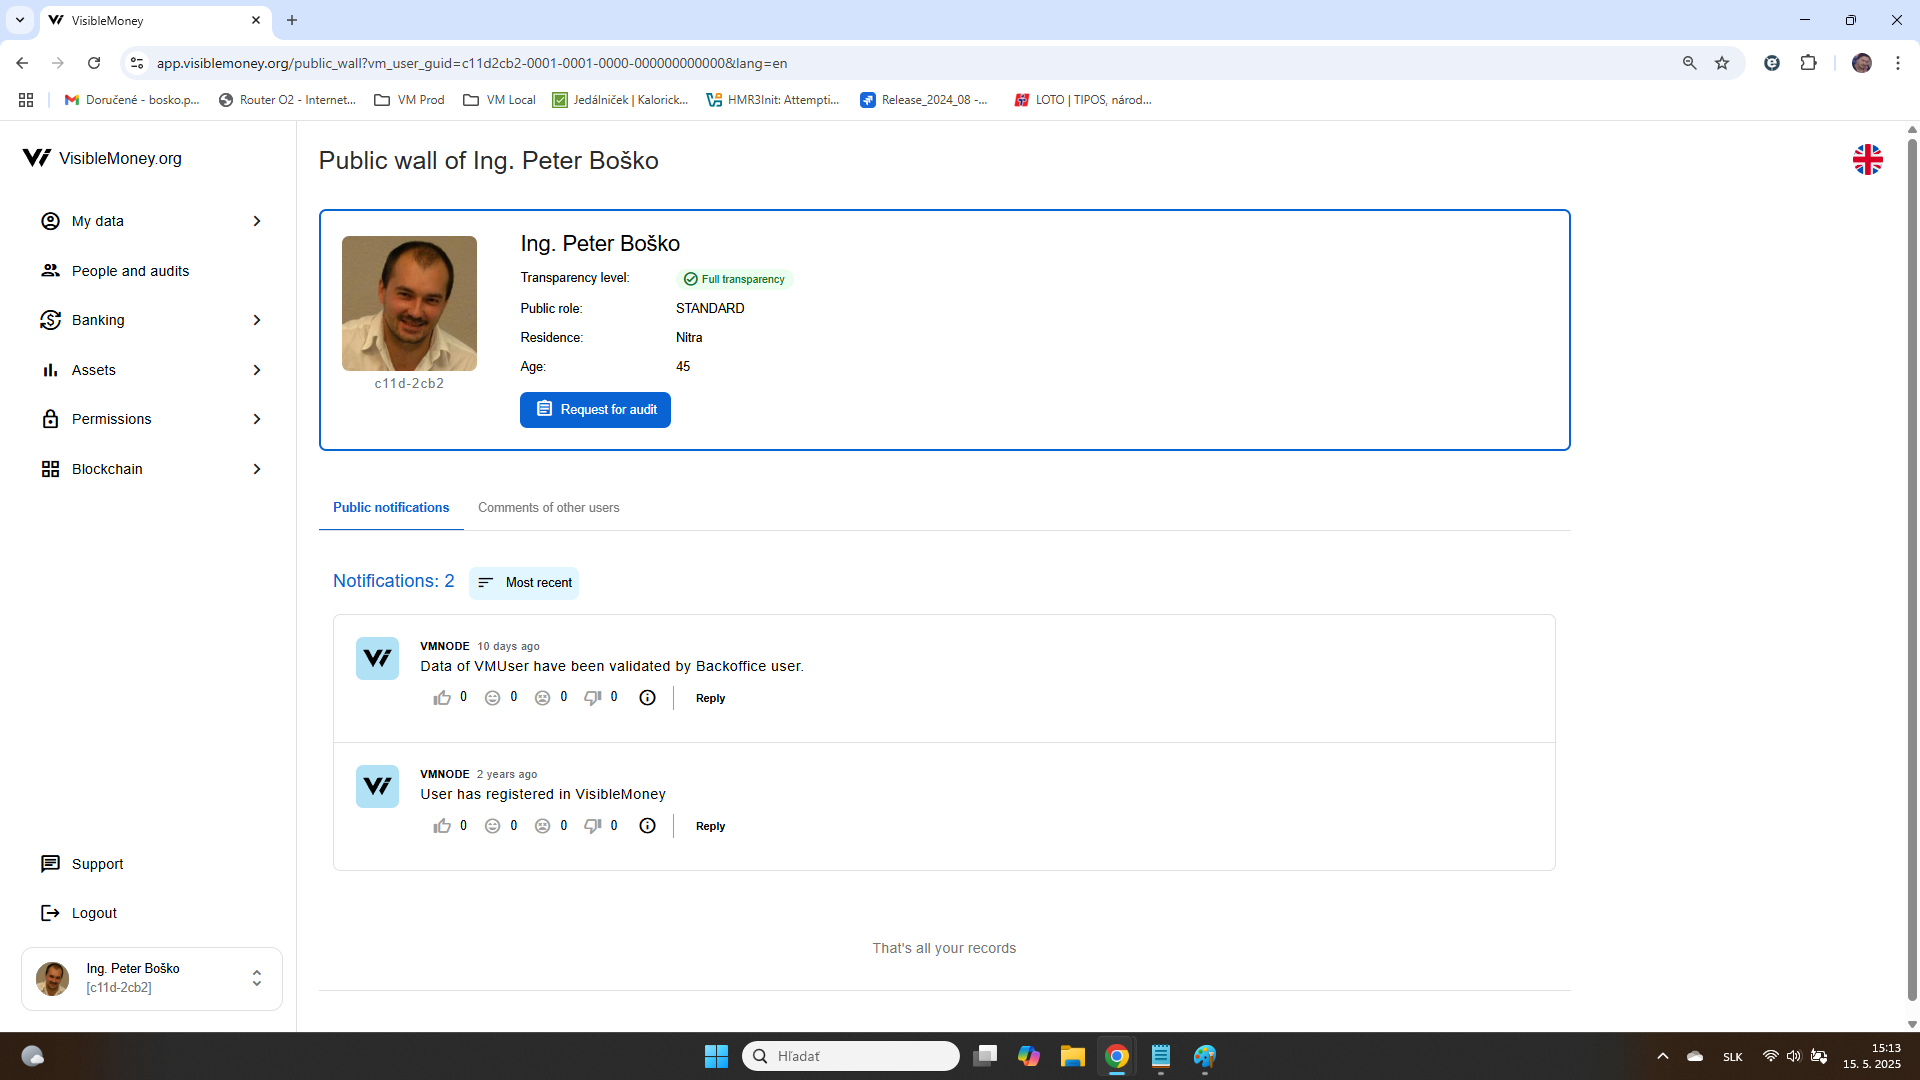
The screen consists of three important sections: a green ‘Request for audit’ button, ‘Public notifications’ generated by the system for that person, and ‘Comments of other users’.
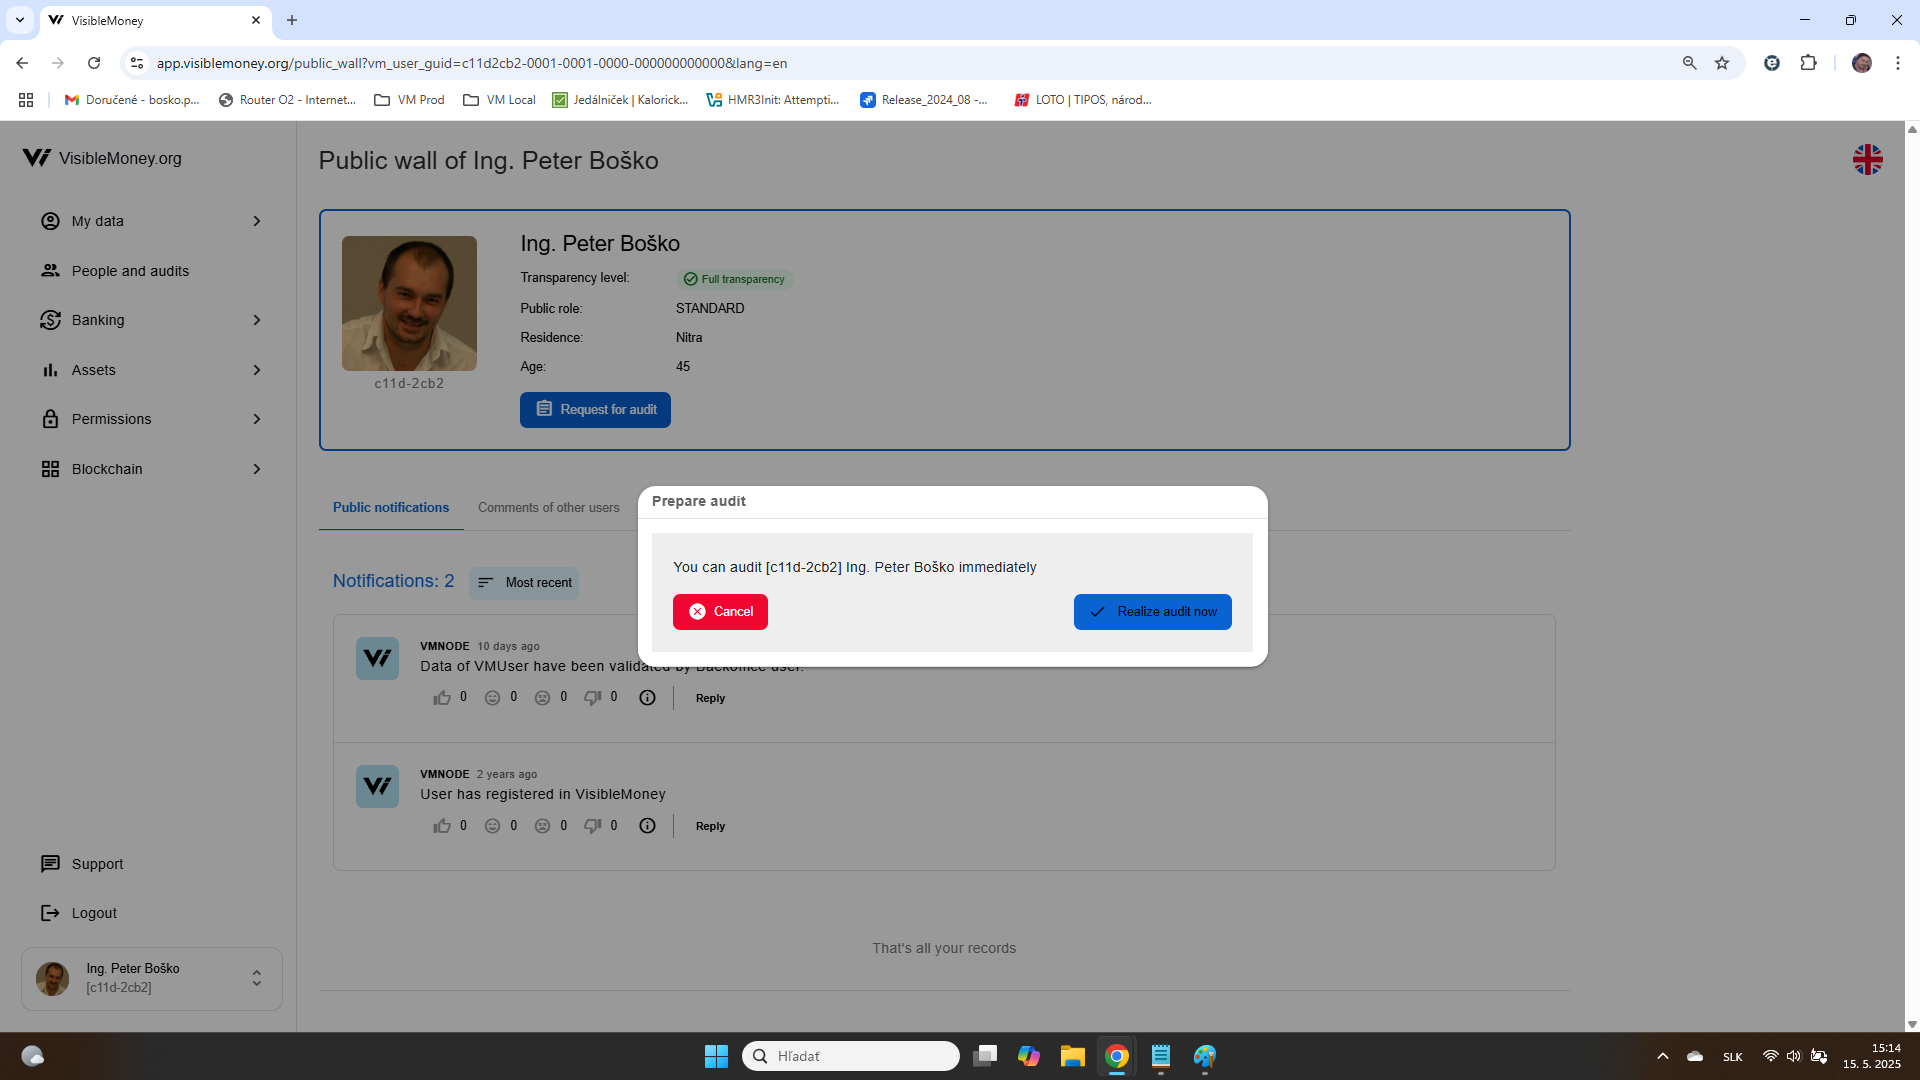
Upon pressing the ‘Request for audit’ button, the system checks whether the logged-in user has auditing rights for that person. If yes, the system displays the following message along with a button to access the audit module of that user.
If the user does not have auditing rights, the system notifies them and generates a private notification to the audited person or their public auditor. Subsequently, the audited person can either approve or decline the audit request. The public auditor, as specified in the request description, can then conduct the audit, and the results are communicated to the requesting user.
Upon pressing the ‘REALIZE AUDIT NOW’ button, the user enters the system’s audit module, which is used to audit the data of the user for whom the audit was requested.
The audit module appears as follows:
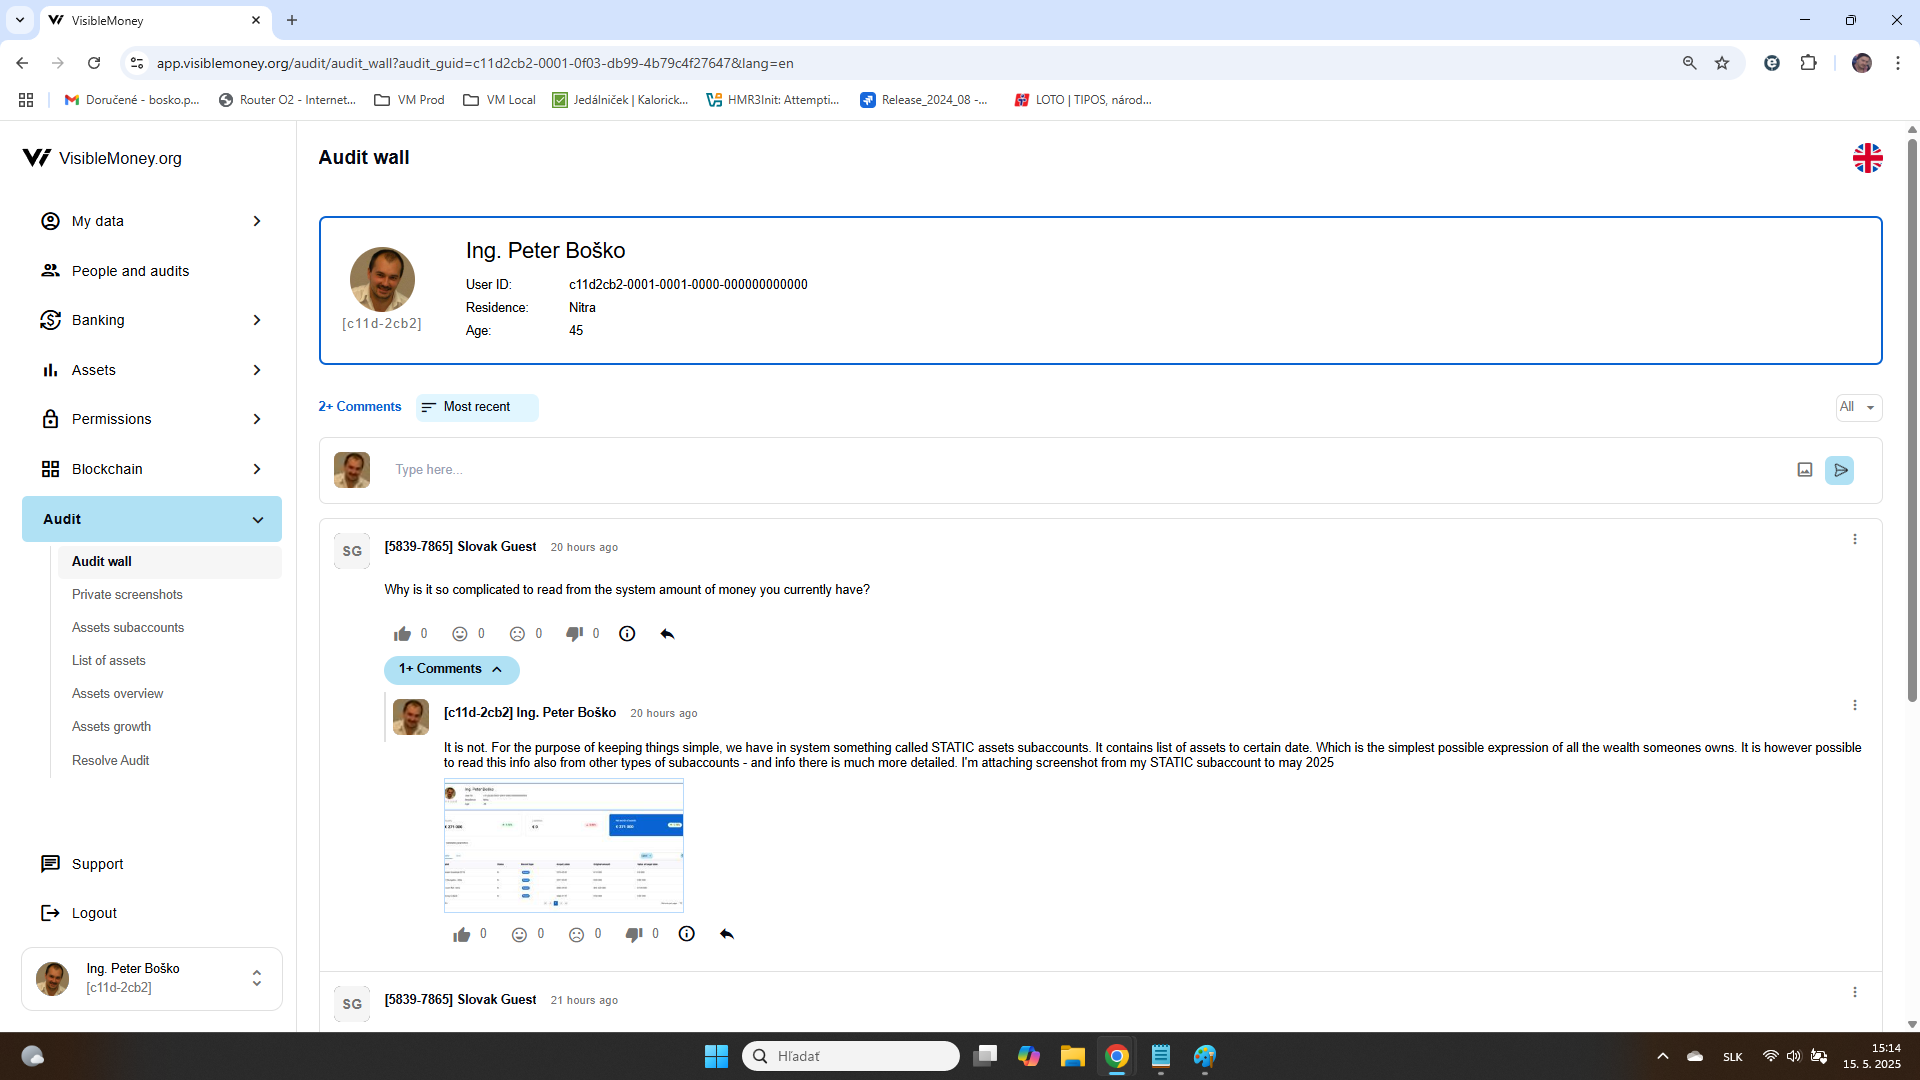
The left menu includes the following items:
- Audit wall – The audit wall displays comments/posts created by all users who have audited this particular user, whose audit wall is currently being viewed.
- Private screenshots – Private screenshots are screenshots of screens taken during the audit. They are used to highlight or request explanations for data found during the audit.
- Assets subaccounts– These screens, similar to those in the Assets module, are used for auditing the data of the user being audited. In the screen, you can also take a screenshot of the data, add your description to it, and then place such a post on the audit wall.
- List of assets – These screens, similar to those in the Assets module, are used for auditing the data of the user being audited. In the screen, you can also take a screenshot of the data, add your description to it, and then place such a post on the audit wall.
- Assets overview – These screens, similar to those in the Assets module, are used for auditing the data of the user being audited. In the screen, you can also take a screenshot of the data, add your description to it, and then place such a post on the audit wall.
- Assets growth – These screens, similar to those in the Assets module, are used for auditing the data of the user being audited. In the screen, you can also take a screenshot of the data, add your description to it, and then place such a post on the audit wall.
- Resolve audit – This screen is used to conclude an audit.
Taking screenshots helps emphasize or request explanations for data during an audit. Screenshots can be taken using the brush icon located in the upper right corner of the screen:
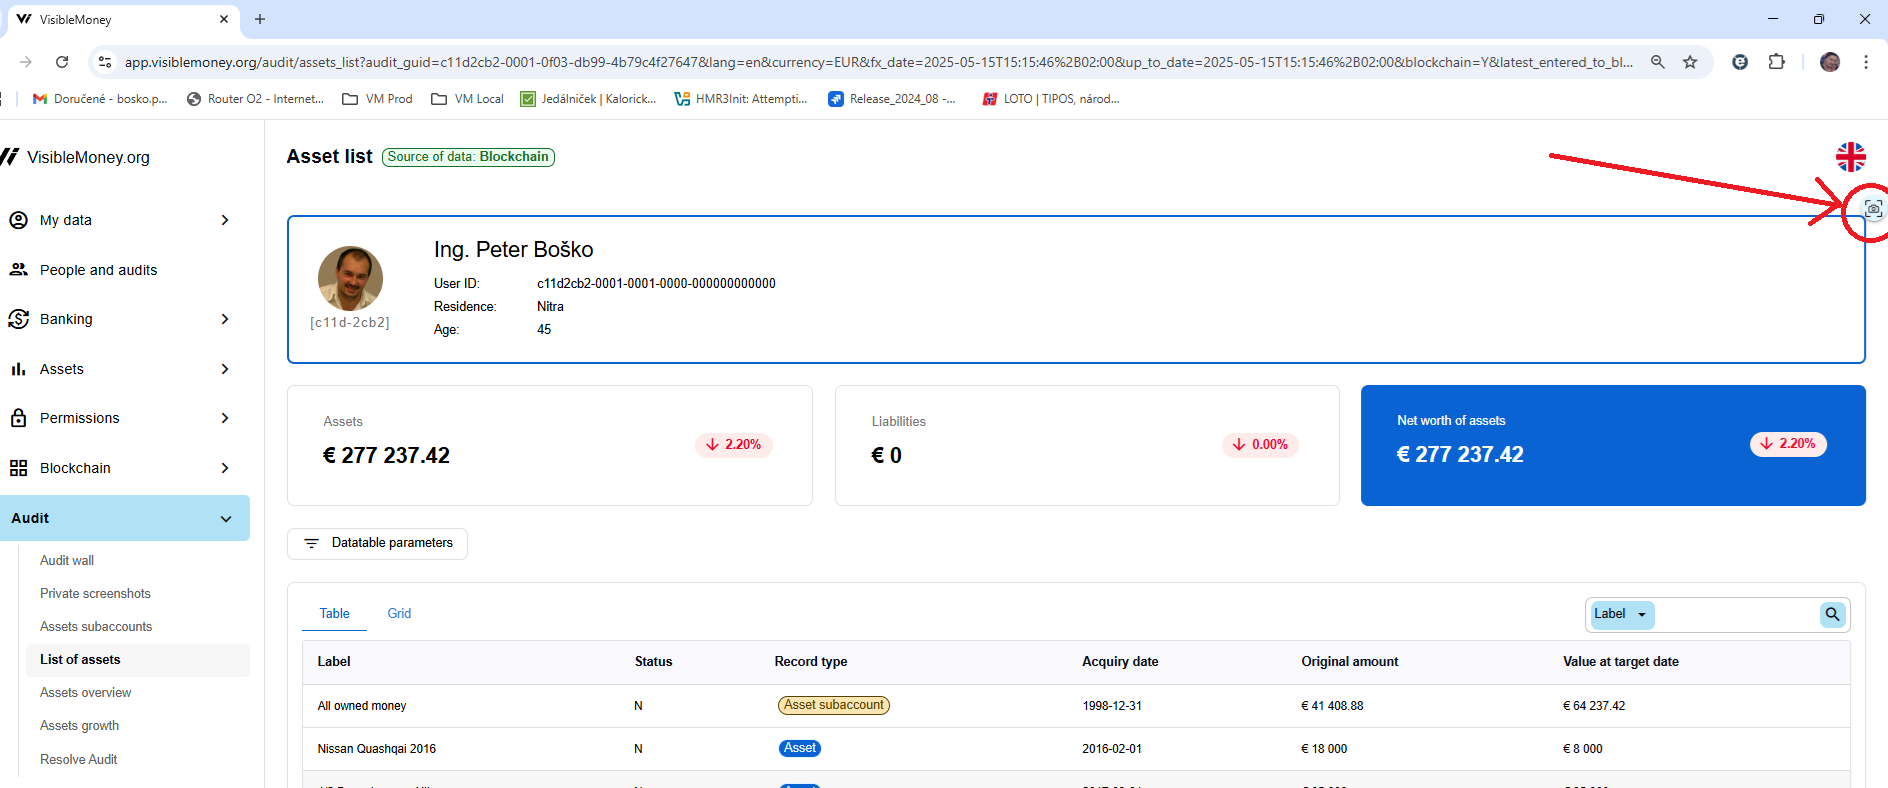
After clicking the icon, the following screen appears:
You can enter questions, highlight a number, or indicate any discrepancies in the screen:
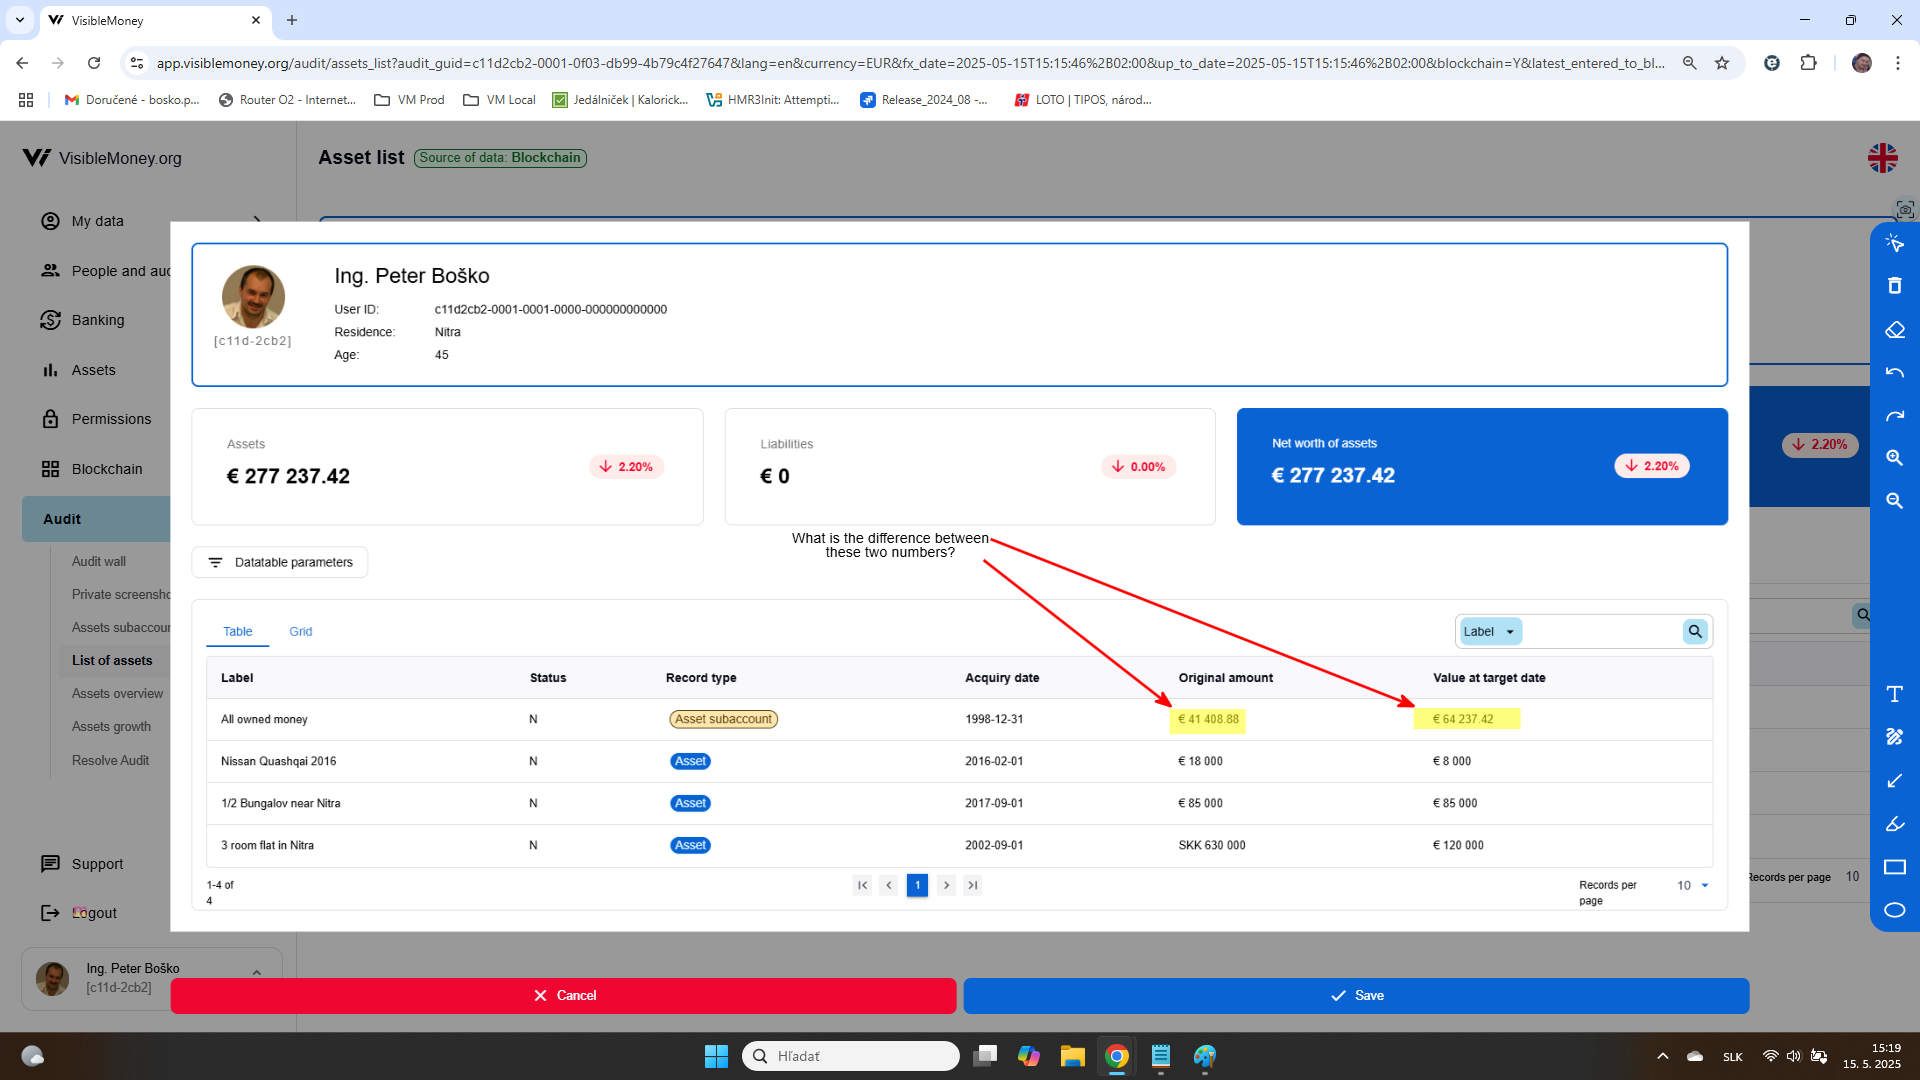
Subsequently, you need to place the private screenshot on the audit noticeboard so that other users who will audit this person can see it.
Views: 415
One comment